
Mindful Movements: To Help You Heal and Recover
Benefits of Mindful Movements
Mindful movements is a series of movements and poses meant to help you before, during and after a hospital stay or medical treatment. The movements and poses work to improve both your physical and emotional healing.
Physical benefits can include:
- Helping you decrease pain, swelling and tension.
- Helping you increase circulation which helps speed wound healing.
Emotional benefits can include:
- Calming your mind.
- Reducing anxiety.
No special training is needed. The movements are right for people of all ages and activity levels. If you had surgery, wait until all drains are removed before doing the movements.
You may have a small amount of discomfort when you do these movements, but they should not cause pain. If you have pain when you do a movement or pose, stop right away and relax. If the pain goes away, try again, but very slowly. If the pain does not go away, talk with your health care provider before you do the movements again.
Follow these general guidelines for doing mindful movements:
- Allow about 20 to 45 minutes to do the complete series of movements and poses.
- Try to do the movements every day or as many times a week as possible.
- Choose a time that is convenient for you. It is not necessary to do the series at the same time every day or before or after any certain activity.
- If possible, do the series on a carpeted floor or on yoga mats.
- Do the series slowly and gently. Follow the directions for how to breathe while doing the movements and poses.
- If you have been told by a health care provider that you should not do certain movements, do not try them without talking with your provider.
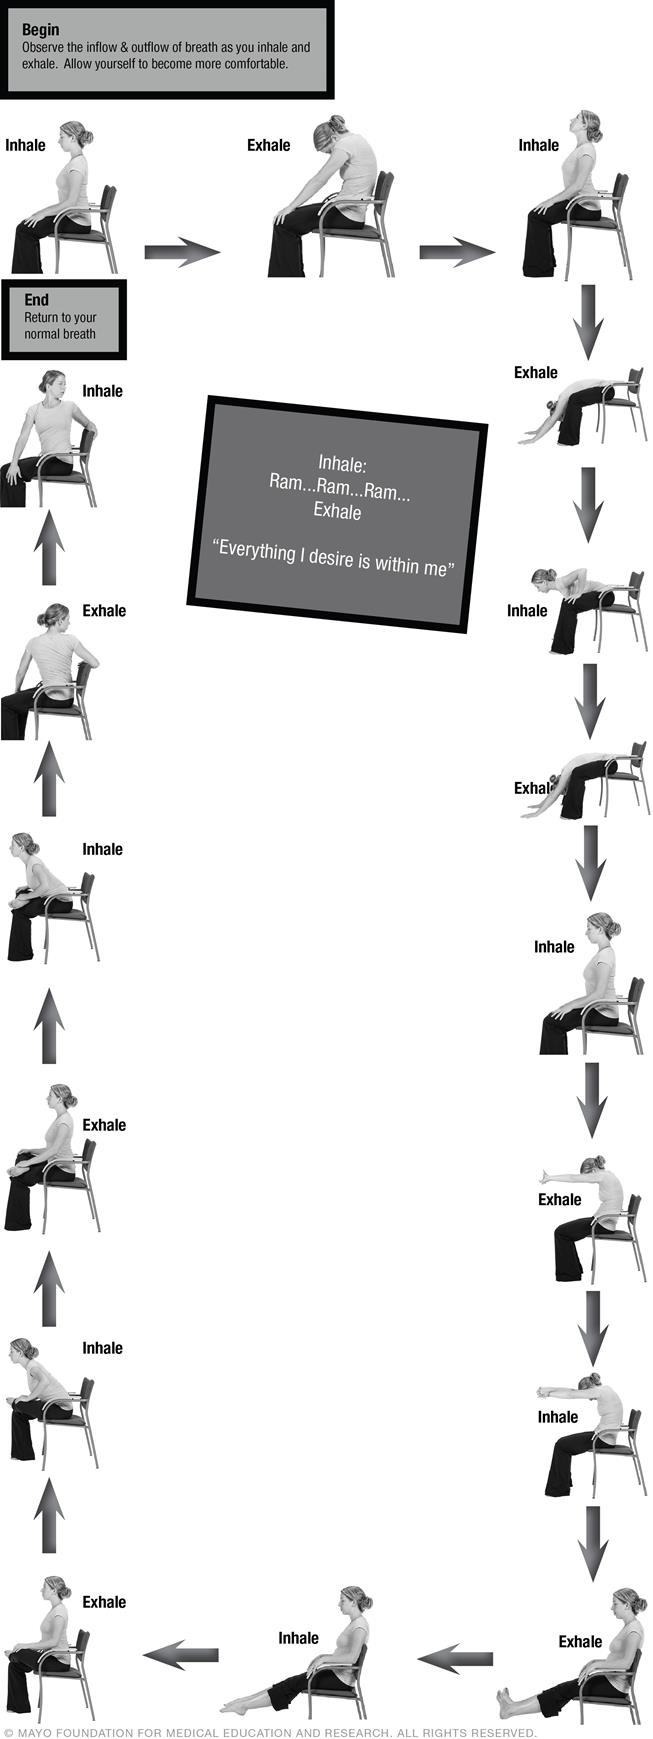
Follow these steps to do “mindful breath”
- At first, try not to change your breath or enhance it. Just notice the “inflow” and “outflow” of your breath exactly as they are.
- Next, focus on taking a single, full breath.
- Start to breathe in more deeply, just enough to make that breath longer and a little smoother.
- Observe your breath. Pay attention to whether you lose focus on that single, full breath.
- Refocus on another single breath, if needed. Then begin to use one breath for one movement.
- You will now be able to practice this breathing with the flow of poses later on in this book.
How to use this information
This information is divided into four main sections. The first three sections are:
- Movements to do BEFORE your hospital stay or treatment.
- Movements to do DURING your hospital stay or treatment.
- Movements to do AFTER you go home from the hospital.
In each of the three sections, you will find individual movements described, together with a photo that shows you how to do the movement or pose. At the end of some of the sections there are individual movements so you can see how to do the complete series.
The final section is about meditation that you can do during all phases of your care.
If you have questions about mindful movements, talk with a member of your health care team.
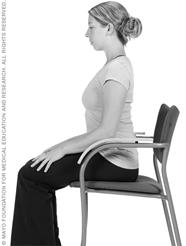
Before Your Hospital Stay or Medical Treatment
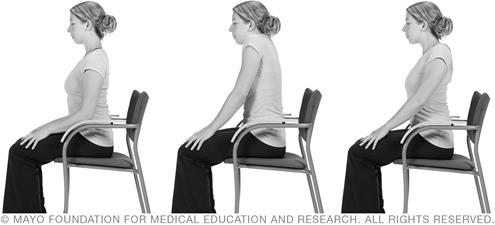
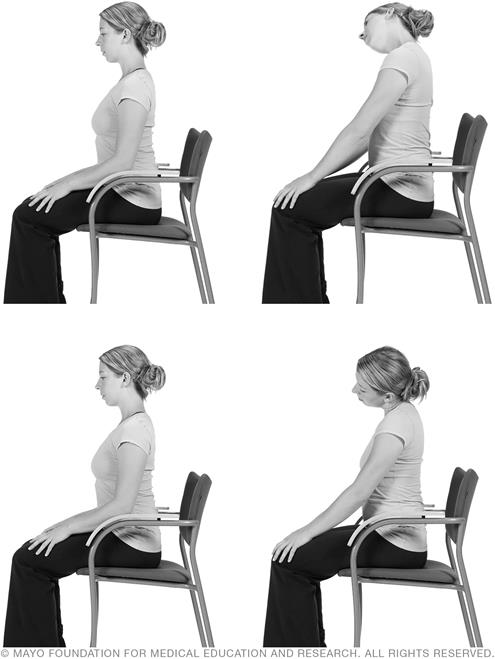
Spine warm-up

- Sit up straight in a chair to make your spine long. Plant both feet flat on the floor and rest your hands on your thighs.
- As you inhale, arch your back and drop your shoulders. Allow your gaze to travel up toward the ceiling.
- As you exhale, round your spine, letting your shoulders come up toward your ears. Drop your chin toward your chest and gaze toward your belly button.
Seated forward bend
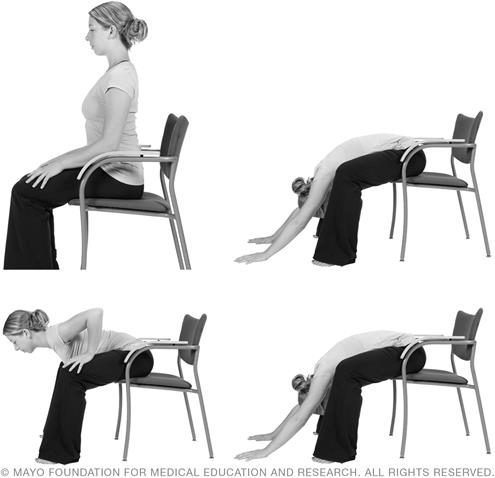
- Sit near the front edge of your chair. Separate your feet so your thighbones are parallel to each other and position your knees directly over your ankles.
- Place your hands on your knees. Inhale as you sit up straight to lengthen your spine.
- As you exhale, tip from your hips as much as you can and allow your torso to travel forward toward your thighs. When you have gone as far forward as you can, that is, your pelvis stops moving, carefully allow your spine to round forward and bring your arms down between your legs.
- Inhale as you move halfway up so your torso is even with your thighs.
- Exhale as you move back down to a forward bend.
- Slowly inhale while you move back to your starting position.
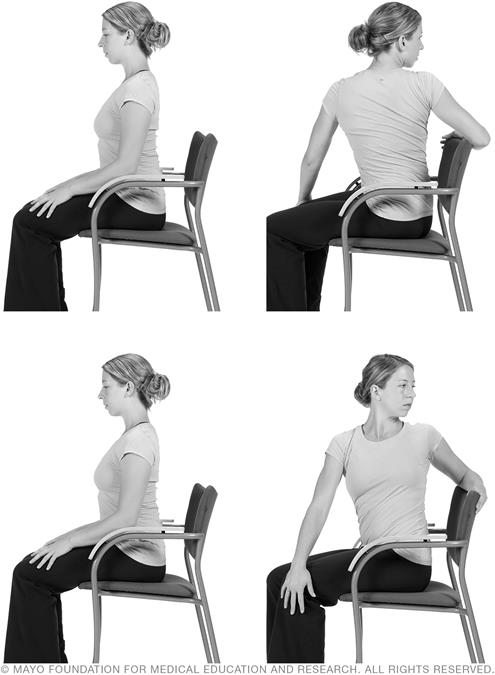
Shoulder stretch
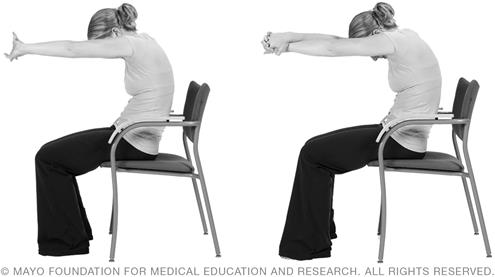
- Sit near the front edge of your chair. Clasp your hands and place your hands on your chest near your heart.
- As you exhale, round your spine. Put your arms straight out in front of you, keeping your hands clasped with your palms facing outward. Allow your chin to drop toward your chest and gaze down toward your thighs.
- Pause here. Inhale.
- With your spine rounded, keep your arms extended and gaze downward. Unclasp your hands, bring your right hand over your left, palms together and re-clasp your fingers.
- Pause here. Inhale.
- Exhale. Unclasp your hands and bring your hands back to your lap.
- Return to your starting position.
Leg and ankle stretch

- Sit down toward the back of your chair.
- Place your arms on the arm rests. Your palms should face downward.
- Extend both legs straight out in front of you.
- Inhale. Point your toes straight up toward the ceiling.
- Exhale. Point your toes straight out in front of you. Push the soles of your feet down toward the floor.
- Gently place both feet back on the floor.
- Return to starting position.
Hip stretch

- Sit near the front edge of your chair. Place both feet on the floor.
- Lift your left ankle and place it on top of your right knee.
- Inhale as you sit up straight to lengthen your spine.
- Exhale, then gently bring your torso forward toward your folded leg. Note the stretch along the outside of your left thigh.
- Inhale as you uncross your left ankle and place your left foot back on the floor.
- Lift your right ankle and place it on top of your left knee.
- Inhale as you sit up straight to lengthen your spine.
- Exhale as you bring your torso forward toward your folded leg. Note the stretch along the outside of your right thigh.
- Uncross your right ankle and place your right foot back on the floor.
Spinal twist
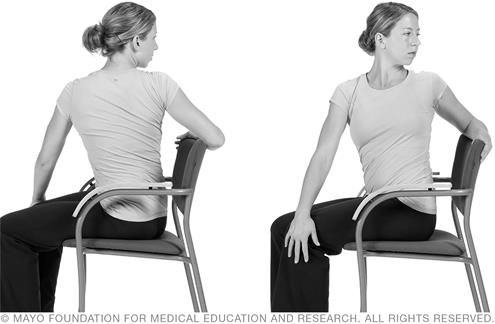
- Sit up straight on the edge of a chair and place both feet flat on the floor.
- Place your left hand on the outside of your right knee. Look over your right shoulder and begin to gently twist your body starting from your lower back to look behind you.
- Drape the right arm over the back of the chair.
- Come out of the stretch slowly. Gaze straight ahead.
- Place your right hand on the outside of your left knee. Look over your right shoulder and begin to gently twist your body to look behind you.
- Drape your left arm over the back of the chair.
- Come out of the stretch slowly. Gaze straight ahead.
During Your Hospital Stay
Wrist mobility
- Sitting comfortably in a chair, extend your arms straight out in front of your chest, allowing your hands to relax with your palms facing down.
- As you inhale, bend your wrists so that your fingers point toward the ceiling.
- As you exhale, bend your wrists so that your fingers point toward the floor. Repeat this movement 5 times.
- When you feel ready, return your wrists to your starting, relaxed position.
- As you inhale again, rotate your wrists outward. Repeat this movement 10 times.
- Once you have completed 10 outward rotations, rotate your wrists inward. Repeat 10 times.
- Return to your relaxed, starting position.
Elbow rotation
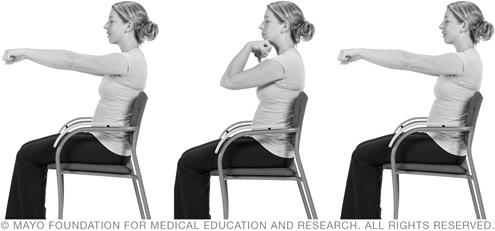
- Sitting comfortably in a chair, extend your arms straight out in front of your chest.
- Make a loose fist with each hand.
- As you inhale, bend your elbows and rotate your fists in toward your chest.
- As you exhale, extend your arms back out straight in front of you.
- Repeat 10 times.
- Exhale as you lower your hands into your lap.
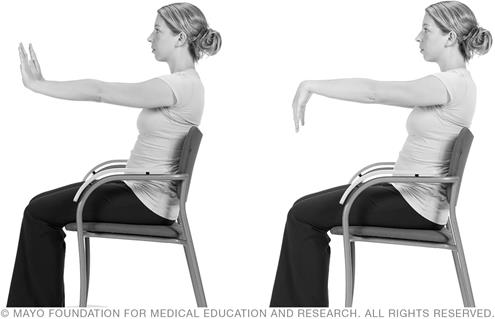
Upper back extension

- Inhale as you extend your arms in front of your chest, cross one wrist over the other and interlace your fingers.
- Exhale as you extend your arms farther forward and round your upper back, creating a deep stretch across your upper back and shoulders.
- Inhale as you return to the starting position.
- Repeat 3 to 5 times.
- Switch so that your other wrist is on top this time and repeat steps 1 to 3 for 3 to 5 times.
- Exhale as you lower your hands into your lap.
Shoulder rotation
- Seated comfortably in a chair, sit up straight, hold your head up high and look forward.
- Inhale as you move your shoulders up toward your ears. Exhale as you rotate your shoulders down and backward, then return to your starting position.
- Repeat 10 times. Maintain good posture.
- Inhale as you move your shoulders up toward your ears.
- Exhale as you rotate your shoulders down and forward, then return to your starting position.
- Repeat 10 times.
Neck bending

- Seated comfortably in a chair, sit up straight, hold your head up high and look forward.
- As you inhale, move your head back as far as you comfortably can and shift your gaze toward the ceiling.
- As you exhale, move your head forward and allow your chin to drop towards your chest as far as you comfortably can.
- Repeat 5 times.
Neck rotation
- Seated comfortably in a chair, sit up straight, hold your head up high and look forward. Inhale.
- As you exhale, slowly bend your neck to the right. Drop your right ear toward your right shoulder.
- As you inhale, bring your head back up high and look forward
- As you exhale, slowly bend your neck to the left. Drop your left ear toward your left shoulder.
- Return to your starting position.
- Repeat 5 times.
- Return to your starting position.
Simple seated twist
- Seated comfortably in a chair, sit up straight, hold your head up high and look forward.
- As you inhale, sit up as straight as you can to lengthen your spine.
- As you exhale, place your left palm on your right knee, grasp the arm or the back of your chair with your right hand and twist to the right.
- Stay in this position while you breathe in and out 5 times.
- As you inhale, return to your starting position.
- Repeat steps 1 to 5, except twist to the left.
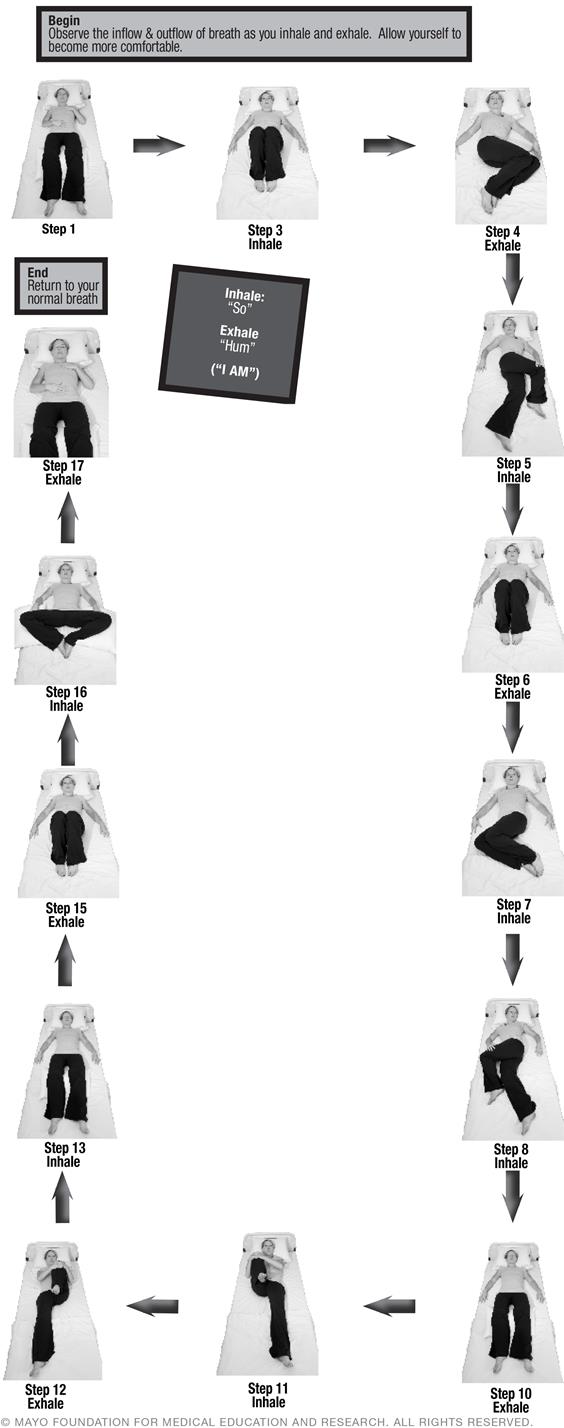
Simple stretches to do in bed
These stretches are demonstrated as a complete series in this information. Not all steps are shown.
- As you wake up, slowly stretch your body. Place your left hand over your heart and your right hand on your abdomen. Take slow, deep breaths.
- Straighten your legs and gently point your toes forward, then flex them backward. Repeat 5 to 7 times. Return to a relaxed position.
- As you inhale, gently bring your hands to your sides, draw your knees up to the ceiling, put the soles of your feet flat on your bed.
- As you exhale, drop your knees to the left side of the bed. Place your right knee on top of your left knee to gently twist your spine.
- As you inhale, straighten your left leg keeping your right knee bent. As you exhale, gently place your left hand on your right knee to deepen the stretch. Pause. Inhale.
- As you exhale, release your right knee. Return to your back, knees bent, soles of your feet flat on your bed. Pause. Inhale.
- As you exhale, drop both knees to the right side of the bed. Place your left knee on top of your right knee to gently twist your spine.
- As you inhale, straighten your right leg keeping your left knee bent. As you exhale, gently place your right hand on your left knee to deepen the stretch. Pause. Inhale.
- As you exhale, release your left knee, return to your back, knees bent, soles of your feet flat on your bed. Pause. Inhale.
- As you exhale, straighten both legs.
- As you inhale, place both hands on your right shin and pull it toward your chest. Keep your left leg extended. Focusing on your right foot, slowly rotate your right ankle 5 times in one direction. Relax, then repeat 5 times in the opposite direction.
- Release your hands from your right shin, straighten your right leg and repeat the movement with your left leg. Return to a relaxed position.
- Straighten both legs on the bed. Move your feet back and forth in unison like your legs are windshield wipers. Repeat 10 to 20 times. Relax and breathe in and out 5 times. Return to a relaxed position.
- Lying flat on your back, take a deep breath in. As you exhale, slowly turn your head to look at your left shoulder. Repeat 3 to 5 times, then look to your right shoulder and repeat 3 to 5 times.
- As you inhale, bend both knees and draw them up toward the ceiling, keeping the soles of your feet flat on the bed. Pause. Exhale. Inhale.
- As you exhale, bring the soles of your feet together to touch from soles to toes and bring them up gently toward your pelvis. Allow both knees to open to the sides of the bed. Place pillows under your knees for additional support. Pause and spend 7-10 breath cycles in this pose. Allow each exhale to relax your knees even further.
- Place your left hand over your heart and your right hand on your belly. Close your eyes and take 3 to 5 deep breaths in and out through your nose.
After Your Hospital Stay or Medical Treatment
Do these movements when you have returned home as you begin your recovery.
Child’s pose
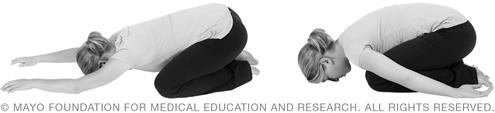
- Kneel on the floor on a yoga mat or on carpet. Touch your big toes together and sit on your heels, then spread your knees apart wider than your hips.
- As you exhale, lay your torso between your thighs, releasing your shoulders and forehead to the floor. If it is uncomfortable to reach the floor, roll up a blanket or use a few pillows to rest your face and torso on.
- Lay your arms and hands alongside your body, palms up, or, arms extended out in front of your body, palms down, whichever is most comfortable for you.
- Stay in this pose as long as it feels good to you.
Cow and cat pose
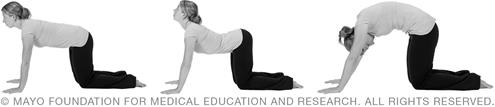
- Move onto your hands and knees in the “all-fours” position. Your hands should be positioned on the ground beneath your shoulders, knees beneath your hips and the tops of your feet flat on the ground so that your toes are not tucked under.
- To do the cow pose, as you inhale, extend your head and pelvis up to the ceiling. Allow your belly to release to the floor.
- To do the cat pose, as you exhale, float the middle of your back up to the ceiling and let your pelvis and head hang toward the floor.
- Repeat these steps 5 times.
- Return to “Child’s pose.”
Gentle cross-legged twist

- Begin in “Child’s pose.” Move into a comfortable, seated cross-legged position. If you are not comfortable on the floor, sit on two folded blankets.
- Sit so that your weight is evenly spread across your tailbone.
- Inhale as you sit up straight.
- Exhale, then rotate your lower rib cage and turn toward your right knee, keeping your spine straight and tall. Rest the back of your left hand on the outside of your right thigh and place your right hand on the floor behind you. Look over your right shoulder. Hold this position as you breathe in and out 3 to 5 times.
- Inhale as you turn back to your seated position.
- Exhale as you repeat steps 1 to 5, except turn toward your left knee.
- Inhale as you turn back to your seated position.
Seated and reclined bound-angle pose

- Begin in your cross-legged, seated position. Bring the soles of your feet together and bring them up gently toward your pelvis. Allow your knees to gently relax.
- If you need support, place a rolled-up blanket under each knee and one behind you for your head and neck.
- Exhale as you lean on your hands for support as you lower yourself toward the floor.
- Lay your arms out beside you on the floor, angled at about 45 degrees from your body.
- When you are ready, press your thighs together with your hands, then roll onto your side and use your arms to gently push yourself up to a seated position.
- Stay in this pose as long as it feels good to you.
Resting inversion: Legs up the wall
This pose is a little harder to do than the earlier ones in the series. Work up to it slowly or do not do it at all if it is uncomfortable. Ask a health care team member to demonstrate this pose for you.
- Place a pillow or rolled-up blanket lengthwise about 5 inches away and parallel to a wall in your home.
- Sit sideways on the pillow or blanket, with your right side against the wall. If you are left-handed, sit on the left end with your left side against the wall.
- In one smooth motion, exhale as you swing your legs up on to the wall and your shoulders and head down lightly onto the floor. This may feel a little funny the first time you try it. Don’t get discouraged!
- Rest your tailbone on the space between your pillow or blanket and the wall. Arch your torso slightly to create a sensation of a gentle backbend.
- If the front of your torso feels flat, you may have slipped off the pillow or blanket. Bend your knees, press your feet into the wall and lift your pelvis up a few inches. Tuck the pillow or blanket a little higher under your pelvis, and then lower your weight back onto the pillow or blanket.
- Lift your head up away from the floor.
- Lay your arms out to the sides with your palms facing up.
- Keep your legs just firm enough to hold them in a vertical position against the wall.
- Halfway or completely close your eyes and rest in this position for 5 to 15 minutes. Remember to do mindful breath during this time. If your mind wanders, bring it back to awareness of how you breathe.
- When you are ready, slide off the pillow onto the floor, then turn to the side. Stay on your side for a few breaths, and gently sit back up.
Final relaxation pose: Savasana

This is your final resting pose and the most important. Make sure you have plenty of space around you and that you are in a quiet, peaceful environment to get the greatest benefit of the pose. If you do not have time to do any of the other movements or poses, make time for this one.
- Begin in your cross-legged, seated position. Lean back on your forearms and bend your knees. Place your feet on the floor.
- Lean back into a reclined position.
- Lift your pelvis slightly off the floor to ensure your tailbone is comfortable. If you need support, place a pillow or rolled-up blanket underneath your head and neck.
- Lift your arms toward the ceiling and then slowly lower them back down to the floor, palms up, at about a 45-degree angle from your body.
- Keep your knees bent and your feet on the floor, allowing your knees fall towards one another. Extend your legs out in front of you to rest on the floor. Allow your feet to open so the sides of your feet are resting comfortably on the floor.
- Close your eyes and allow yourself to be completely comfortable. Relax your jaw, tongue, lips, eyes and forehead. Breathe in and out slowly and gently.
- Stay in this pose from 5 to 30 minutes or as long as you feel comfortable.
- When you are ready, gently roll onto your right side as you exhale while you rest your head on your arm. Breathe in and out 2 to 3 times. Then, as you exhale again, press your hands against the floor and gently sit up.
Meditation
Meditation refers to many different practices that people can use to develop a calm and focused mind. Anyone can learn to meditate.
Meditation serves to help you remain still to see what is in the present moment. While doing so, you can become “self-aware.” You can learn to accept “what is.”
As you begin to meditate, be a beginner every time you do so with an open mind and fresh eyes. Let your time in meditation have no goals, not even “stress relief.” Having no expectations allows you to benefit from what might be offered during your time meditating.
Follow these steps:
- Sit comfortably with your spine long. You can lie down in a bed, be seated in a chair or stand on your feet. The important thing is that you find a place to be comfortably still. Practice different positions until you find one that works for you.
- Close your eyes or keep them open with your gaze unfocused.
- Place your hands in a relaxed position resting on your legs.
- Begin mindful breath. Observe the inflow and outflow of your normal breathing pattern.
- Let your mind wander. Notice this with gentle patience, then return to mindful breath.
- As you become more comfortable, begin to notice your body just as it is while you breathe in and out. With each outflow of breath, try to release unnecessary tension you may be holding in your body such as in your shoulders, jaw or forehead.
- As you return to mindful breath, begin to notice your thoughts, feelings and emotions. Let your breath give you a feeling of space to step back and observe. If this does not happen for you, gently return to mindful breath.
- Sit in meditation as long as you are able and let yourself be exactly as you are in that moment.
Mindful Movements Final Thoughts
After you complete mindful movements, take the peaceful feeling you have as well as the mindfulness with you as you go through the rest of your day and as you continue to heal. Recognize that doing mindful movements is most helpful if you do the series every day.
If you have questions about mindful movements or about the information in this material, talk with your health care provider.